Why we started this idea????

A passion for food, wine, friends and entertaining is a big part of our life. This is a way for us to document our experiences, passion for food & life and also share it with others.


Tuesday, April 30, 2013

No-Bake Peanut Butter Pretzel Cookies


Can you believe in the two and half years of our blog we have only posted 3 cookie recipes? I was shocked. Admittedly we aren't huge dessert people but I do love cookies. But evidently we haven't been making them much in the past few years. 

The times we most often do bake cookies is when our niece & nephew visit. And these cookies were recently made with my beautiful 14 year old niece that was escaping her brother's paint balling birthday party and 12 boys. It was a cold, rainy, gray day with not much going on so making cookies seemed like the best way to spend part of our afternoon. 


I actually put my niece on Foodgawker and gave her the assignment to find the cookies she most wanted to make. She found this recipe for Ridiculously Easy No-Bake Peanut Butter Pretzel Cookies on Half Baked Harvest. And indeed they were easy.

And they definitely met our craving for chocolate and peanut butter and it was even better that they were so quick and easy to make with some simple clean up. 


Oh yeah, that's why we rarely make cookies I hate the clean up.

RECIPE:

Ridiculously Easy No-Bake Peanut Butter Cookies from Half Baked Harvest

1 cup pretzel crumbs (leave a few bigger pieces, but only a few), plus 20 whole tiny twists
1/2 cup graham cracker crumbs
3/4 cup creamy peanut butter (you can use almond butter or any other nut butter)
1/3 cup honey
2 teaspoons vanilla extract
1/2 teaspoon cinnamon (optional)
1/8 cup mini chocolate chips (optional)
melted dark chocolate, for drizzling

  1. Combine the pretzel crumbs (for the most part, try and get the pretzels into small crumbs, but it is ok if there are a few bigger pieces, it adds a little crunch), graham cracker crumbs, peanut butter, honey, vanilla and cinnamon in a mixing bowl or bowl of a stand mixer. Mix together until all the ingredients are combined. If you are using a mixer this goes really fast, just beat until a ball forms. If you are using a spatula the dough will be crumbly just keep mixing until it looks wet enough to stick together (you're going to need to put some muscle into it!). Once the dough is combined fold in the chocolate chips - if using. Form the dough into one inch balls and flatten into a cookie. Place on a baking sheet lined with parchment paper.
  2. Melt the chocolate in the microwave or in a double broiler.
  3. Top each cookie with one pretzel and then drizzle the dark chocolate over the pretzel "glueing" it to the cookie.
  4. Refrigerate for at least 30 minutes before serving.

Sunday, April 28, 2013

GCC: Malaysian Mussels


This week our Gutsy Cooks Club assignment included a dish from a cuisine that we love and often cook, Malaysian Mussels from Martha Stewart's website.

As comfortable and familiar as we are with these ingredients we actually weren't aware that they were Malaysian. But evidently Thai and Malaysian cuisine are quite similar. I guess it shouldn't be a surprise really given Malaysia, Indonesia, Philippines and Thailand all surround the same body of water, have the same climate and natural resources. Ironically, we had this meal after watching the movie The Impossible about the horrific 2004 Tsunami in the Indian Ocean in Thailand. Wow, the beauty of the country and the absolute chaos an event like this brings. An unbelievable movie.


And from that beautiful landscape come these fantastic flavors. What's not to love about coconut milk, curry paste, ginger, lime and cilantro. These fresh ingredients are the base of many Thai flavored dishes we love to make. 

And they are the perfect surrounding flavors for mussels. Living in the Pacific Northwest mussels are readily available to us all year round and we often take the opportunity to enjoy. They are generally a quick Friday night go to meal for us to make. We usually do them very similarly to this recipe. Or sometimes with chorizo and white wine. And almost always with some good crusty bread to sop up all the extra flavor goodness. 


Here's the thing about mussels you have to take the time to clean them well. They have these yucky beard things that have to be pulled off. We generally get them home and immediately get them into a cold water bath that we'll change 4-5 times. Then we scrub them with a vegetable brush. Finally, we pull the hairy beards from the shells. This time and effort makes all the difference in the world in being able to enjoy the meaty, briny mussel meat.

I added some jalapeño pepper for color and heat besides that we didn't get very "gutsy" with this recipe because these flavors make for a delicious dish. And I believe don't mess with what works too much. 


We both wanted to eat our mussels differently. I wanted them served over a fragrant Jasmine rice. And G wanted them as we usually have them served with some good crusty bread. 


Both ways were tasty but I wanted it to be more of meal and rice made it more of a entree in my mind. 


We had our mussels with some fresh spring rolls and a crisp Sauvignon Blanc from the Columbia Valley.


Recipe:

Malaysian Mussels from Martha Stewart

  • 2 tablespoons safflower oil
  • 2 cloves garlic, minced (2 tablespoons)
  • 1/2-inch piece ginger, minced (2 tablespoons)
  • 1 tablespoon red curry paste
  • 1 cup coconut milk
  • Coarse salt and freshly ground pepper
  • 2 pounds mussels, beards removed and scrubbed clean
  • 12 cilantro sprigs, chopped
  • 1 lime, cut into wedges

Directions

  1. Heat oil in a large skillet over medium-high heat. When oil shimmers, add garlic and ginger and saute until fragrant, about 1 minute.
  2. Stir curry paste into garlic and ginger and continue to cook 1 minute more. Add coconut milk, salt, and pepper to skillet and bring to a boil.
  3. Add mussels to skillet, cover, and cook just until mussels open, 2-3 minutes. Transfer mussels to a large serving bowl with a slotted spoon. Pour coconut curry sauce over mussels, garnish with cilantro and lime and serve immediately.

Tuesday, April 23, 2013

April Supper Club: Mexican Made Easy Theme


Our April Supper Club was hosted by Lisa & Derek this month. Lisa was making the main dishes from Mexican Made Easy by Marcella Valladolid and suggested we use her recipes as our theme for the month. Which was a great idea.

Having just returned from Mexico we thought, "perfect." Since we were assigned appetizers G really wanted to make the ceviche tostadas with chipotle creme that we learned to make during a beach side cooking class that we attended when recently in Cabo San Lucas. So we kind of detoured from the assignment  and great idea after all I guess. Sorry Lisa & Derek.


Lisa & Derek generously greeted us all with these fantastically beautiful Mexican Cucumber Martinis. They were quite the "kicker" to start off our Mexican themed feast. And feast it was.


We brought some typical "when in Mexico" starters of sliced cantaloupe and jicama squeezed with lime and sprinkled chile salt. One of G's favorite snacks.


Our main contribution was a  fresh rock fish ceviche to make tostadas with.


Served with a pumpkin chipotle salsa and a chipotle creme and 


our favorite to make; creamy guacamole both made and served in our beloved mocajate.
We love it because it's makes guacamole the most perfect consistency in addition to the fact that it brings back our memorable experience lugging  the whole awkwardly packed 40 pounds of it back on the plane from a Mexico trip several years back. 


Once we were thoroughly stuffed of course we moved into the dining room and onto Lisa's main entree with multiple dishes including; the most delicious corn and poblano lasagna,


creamy corn cups and Mexican style slaw. The lasagna and creamy corn were soooooo good. I can't wait to make both recipes ourselves in the future. By this point I was beyond full.

But Kris & Jeff made my all time favorite dessert Tres Leches Cake. And in my opinion it was spot on scrumptiously good. I had to indulge given it is my favorite and I rarely have the chance to enjoy it. But my full stomach that has been pretty strictly Paleo lately and was hurting on the drive home. But it really was worth it. 

Wow, we can't remember the last time we left Supper Club so stuffed. It was a marvelous meal and a fun theme. All of Marcella's recipes are linked below. We'll post our ceviche, chipotle creme and guacamole recipes in an upcoming future post. 

Can't wait for our May gathering. The word on the street the meal is going to be completely in the hands of the men. This is maybe the third time this has happened for our group in almost 10 years of our club's existence? So it's a treat when the guys step up. 
We'll see if it comes to be.


RECIPES:


Mexican Cucumber Martinis - Recipe here
Ceviche Tostadas w/ Chipotle Cream- Recipe soon to come
G&T's Creamy Guacamole- Recipe soon to come
Corn & Poblano Lasagna - Recipe here 
Creamy Corn Cups (Esquites)- Recipe here
Mexican Style Slaw- Recipe here 
Tres Leches Cake- Recipe here 

Sunday, April 21, 2013

GCC: Sun-Dried Tomato Parmesan Crisps


This week for Gutsy Cooks Club our assignment was these tasty little treats; Sun-Dried Tomato Parmesan Crisps. 

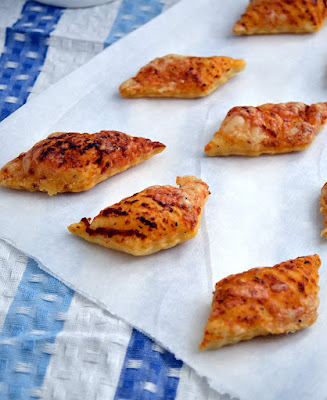
And talk about a find of a recipe. It was simple and right out of the oven these little bites were pretty much irresistible, like I dare you to eat just one kind of irresistible. Made with frozen puff pastry, which we typically do have in our freezer, they are the perfect last minute, "nothing to snack on, " whatever excuse you need...kind of snack. 


Super simple. Start with some sun-dried tomato paste mixed with olive oil.


Roll out the puff pastry. More evidence that I'm not a baker would be the horrific job of evenly rolling out the pastry dough. But even with this work they tasted scrumptious.


I then spread the dough with the sun-dried tomato and olive oil mixture.


I was actually excited to have an excuse to use this little gadget we have in our mess of drawer to make ravioli that we've only used two times.


I used the crinkle wheel to cut the dough in diagonal pieces.


And then topped the dough with some shaved Parmesan. 


They came out of the oven crispy, cheesy and delicious. 


I made them to go with the at home version of the roasted tomato soup that we made during our cooking class in Cabo. I made the crucial component of the soup; the herb infused olive oil. 


I slathered the Roma tomatoes with the oil and a good douse of seasoning. 


Without the wood fired oven I had to roast ours on our grill. But sadly my soup hardly tasted anything like the lush soup we had in Mexico. It was disappointing.
So I won't be sharing the recipe because obviously we need to tweak it a bit to get it right. 


Luckily, the real star of the meal was the crisps anyway.


One of the things I love about Gutsy Cooks Club is recipes like this. Recipes that might catch my eye but I don't really have a reason to make them. But GCC gives me the reason to try and then they become "our" recipes. 


We actually used them the next night as croutons in our Caesar salad. A great way to use up some leftovers. 

Check out  the recipe here.

Check out the other Gutsy Cooks' recipes here

RECIPE:


Sun-Dried Tomato Parmesan Crisps (from Martha Stewart)
3 tablespoons sun-dried tomato paste (or regular tomato paste)
1 tablespoon extra-virgin olive oil
All-purpose flour, for dusting
1 piece store-bought puff pastry, thawed
1/2 cup freshly grated Parmesan cheese
1/4 teaspoon ground black pepper
Directions
Preheat oven to 375 degrees, with oven rack in center position.
In a small bowl, combine sun-dried tomato paste and olive oil.
On a lightly floured surface, roll out puff pastry to 12-inch square. Transfer to a parchment-lined baking sheet.
Spread tomato paste mixture evenly over puff pastry with a rubber spatula. Top with cheese and black pepper. Using a pizza wheel, cut into quarters in one direction and sixths in the other to yield 24 pieces.
Bake 20 to 22 minutes until puffed and golden. Let cool to room temperature on cooling rack before serving.


Thursday, April 18, 2013

Grilled Halibut with a Citrus and Caper Beurre Blanc


Each year we look forward to this time of year when fresh halibut directly off the boat from
Alaska is easily available to us. Halibut is usually available to us all year but most of the year it's previously frozen which is fine. But fresh from the sea halibut, really nothing compares.


We have a handful of "go to" halibut recipes that we use, but to be honest we are still always looking for new ways to prepare our favorite fish. I remembered that one of the restaurants that I used to work at made fresh halibut with a beurre blanc sauce that was amazing. So we decided to try to make a version of a beurre blanc made with capers and citrus to go with our grilled halibut. 

It was a fantastic dish that we both really dug. I'm pretty sure we'll be making a beurre blanc sauce again with halibut.


RECIPE:


Grilled Halibut with Citrus and Caper Beurre Blanc
Makes 2 servings
1 lb fresh halibut cut into 2 portions (brushed with olive oil & seasoned w/ salt & pepper)
2 Shallots, finely minced
3/4 cup white wine
1/2 cup + 2 tblspns freshly squeezed lemon & orange juice
4 oz ( 1 stick) cold butter, cut into 8 pieces
Salt & pepper to taste
3 tblspns drained capers
Parsley, minced for garnish

Grill halibut until cooked through with grill marks. Put wine in sauce pan over medium heat. When wine is hot add shallots. Bring wine to boil and reduce until thick and syrupy reduced to 1/4 cup. Reduce heat to fast simmer and add lemon juice, then add butter 2 pieces at a time until melted. Remove sauce from heat add the capers and parsley. Plate halibut and pour sauce over halibut .


Tuesday, April 16, 2013

Chicken Chow Mein


I'm not fully sure why but lately I've had a big hankering for chicken chow main. Definitely not something I get cravings for usually but for some reason it's been on my list of things we need to make. 

It's funny thinking about food and the memories it conjures for you. My dad loved to go out to dinner. And I remember growing up most Fridays after he got home from work we'd go out for dinner. And one out of every 4 times on Friday it seemed like we went out to Chinese food. Always the same place. Often my younger sister would fall asleep in the car on the way to dinner because we lived in what seemed like in the middle of no-where and the Chinese restaurant, Forbidden City , was in downtown Puyallup. We pretty much always ordered the same thing, a family style meal with sweet &  sour pork, almond chicken and chicken chow mein along with a few other dishes. 


And really Chicken chow mein wasn't my favorite of the dishes we'd get but sometimes I guess it just sounds good. We don't often eat Chinese food like I used to have growing up. We tend more to either have Thai or Vietnamese when we go out or order in.

New wok before seasoning

I searched around for a few versions of chow mein that I could I could make until I settled on this one. I also decided it was time for a new wok to make this dish. 

Old 15+ year old wok
The one we've had for over 15 years seems in due of a replacement. 


I started by prepping the veggies and mixing the sauce ingredients before cooking the strips of chicken breast.


Next I added the veggies and sauce to the wok.


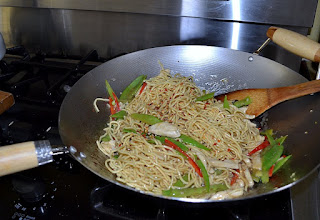
And then the noodles and the chicken again. Actually so simple to pull off.


It was good, good stuff. Although I felt so stuffed after eating it will likely be a long, long time before we have it again especially since it's far from Paleo with the noodles.


We served it with a 2011 Semillon from one of my favorite wineries in Walla Walla; L'Ecole.
Which paired beautifully with it's fruity and light flavor.


It's funny as much as we cook I'm always surprised how many things are still new to us to cook when we find them, like this dish. 

RECIPE:


Chicken Chow Mein ( Adapted from Food & Wine)


  1.  5 tablespoons vegetable oil
  2. 1 pound fresh plain chicken sausages, cut into 1/2-inch pieces (We used chicken breast)
  3. 4 garlic cloves, minced
  4. 2 tablespoons minced ginger
  5. 4 ounces snow peas, cut in half
  6. 2 fresh, hot long red chiles, seeded and thinly sliced
  7. 1/3 cup fresh orange juice (We used Pineapple juice because that's all we had for juice.)
  8. 1/2 pound fresh or dried Chinese egg noodles, cooked (we used fresh)
  9. 1 cup chicken stock mixed with 3 tablespoons of hoisin sauce and 2 teaspoons of cornstarch (we used Oyster sauce instead of hoisin sauce)
  10. Salt
  11. 1/2 cup slivered basil leaves
  1. In a wok, heat 2 tablespoons of the oil. Add the chicken sausage and stir-fry over high heat, breaking it up, until just cooked through, 3 minutes. Transfer to a plate.
  2. Heat the remaining 3 tablespoons of oil in the wok. Add the garlic and ginger and stir-fry over moderately high heat until golden, 1 1/2 minutes. Off the heat, stir in the snow peas and chiles for 1 minute. Add the orange juice and stir over moderately high heat for 30 seconds. Add the sausage, noodles and stock mixture, season with salt and stir-fry until the sauce is thickened, about 2 minutes. Remove from the heat, stir in the basil and serve.

Sunday, April 14, 2013

GCC: Steak Pizzaiola


This week our Gutsy Cooks Club challenge was Steak Pizzaiola which is braised chuck steak smothered in tomato sauce. 


Sally Porkchop & I had a kind of relaxing weekend to ourselves with G skiing for the weekend. We took a long walk Sunday morning that evidently pooped my pup out. We walked in the door and she just plopped herself down right inside the door in front of her mess of toys and fell asleep which allowed me some time to get into the kitchen.


I gathered all the fixings which were few.This is actually a pretty inexpensive meal too given that chuck steak is low in price. I used fresh herbs because I love them. Simple stuff here.


The key to a good braise is liberal seasoning with salt & pepper & a solid searing of the steak. This brown stuff is FLAVOR. You can't skip this step. After searing the steak you remove it and add the garlic, herbs, tomato sauce & paste to the pan.


Then you return the steak to the pan and put it in the oven for a couple of hours. 
I shredded the steak to make a ragu type of sauce to serve over G's favorite pasta, pappardelle.


Mine cooked a few hours extra on low waiting for G to get home from skiing so at the end I added some more tomatoes and decided it could use a couple of tablespoons of sugar to help balance the acid out. 


It came out delicious.


We served it with a 2011 Merlot made by Canoe Ridge from the Horse Heaven Hills appellation.


While it was braising in the oven I took a time out to play with the bully in the almost spring like sunshine. Our girl loves the sunshine. 


Once G got home I made a quick salad and we enjoyed our Steak Pizzaiola with some shaved parmesan cheese and minced herbs. 

Check out the other Gutsy Cooks dishes here on Monica's Sweetbites blog. 


RECIPE:

Steak Pizzaiola from Mad Hungry
  1. 2 1/2 pounds bone-in chuck steak, or 2 pounds if boneless
  2. 1 teaspoon coarse salt
  3. Freshly ground black pepper
  4. 2 tablespoons extra-virgin olive oil
  5. 3 to 4 garlic cloves, minced
  6. 1 teaspoon dried oregano
  7. 1 teaspoon dried thyme
  8. 1/4 teaspoon crushed red pepper flakes
  9. 1 tablespoon tomato paste
  10. 1 28-ounce can whole tomatoes, with juice
Directions
  1. Preheat the oven to 325 degrees Fahrenheit. Season the meat on both sides with salt and pepper. Heat a large ovenproof skillet over high heat and swirl in the olive oil. Brown the meat on both sides. Remove the meat from the skillet and take the pan off the heat.
  2. Stir into the pan the garlic, oregano, thyme, red pepper flakes, tomato paste, and whole tomatoes. Mash up the tomatoes with the back of a spoon, return the meat to the pan, spoon the sauce over it, and cover tightly.
  3. Braise in the oven for at least 2 hours, stirring occasionally. Uncover and cook for an additional 30 minutes, until the sauce has thickened up.