Why we started this idea????

A passion for food, wine, friends and entertaining is a big part of our life. This is a way for us to document our experiences, passion for food & life and also share it with others.


Showing posts with label appetizer. Show all posts

Sunday, November 29, 2015

Turkey Hot & Sour Soup


When we ended up cooking two turkeys on Thanksgiving for only 6 people it was a given that we would need to get creative with what to do with all of the leftovers.

It happened to be a very cold weekend and one of our favorite soups on a cold day is hot & sour soup. To be honest it can be difficult to find a good hot & sour soup at any of our local Chinese restaurants. So when we came across a recipe for it in a recent Food & Wine magazine it seemed like the perfect way to put some of that leftover turkey to good use.

And with the 'hankering' for hot & sour soup came the idea to make some some quick smoked turkey spring rolls to go along. 


We didn't really have a recipe for the spring rolls they just kind of came together really. 

The soup was actually delicious. Warm, hot & sour and satisfying all the way around. We wish we would of diced the tofu slightly smaller but besides that it was excellent. 

RECIPE:


Hot & Sour Soup (From November 2015 Food & Wine)

INGREDIENTS

  • 1 ounce dried wood ear mushrooms (1/2 cup)
  • 2 tablespoons canola oil
  • 1/2 pound lean pork shoulder, sliced 1/8 inch thick and cut into 1-by-1/4-inch strips
  • 1 tablespoon finely chopped garlic
  • 1 tablespoon finely chopped peeled fresh ginger
  • 1/2 cup chopped scallions
  • 4 cups chicken stock or low-sodium broth
  • 1/2 pound soft tofu, cut into 1/2 -inch dice
  • 1/3 cup unseasoned rice vinegar, plus more for serving
  • 3 tablespoons soy sauce
  • 1 teaspoon sugar
  • 1 teaspoon black pepper
  • 1 teaspoon toasted sesame oil
  • 1 tablespoon Sriracha, plus more for serving
  • Kosher salt
  • 2 large eggs, beaten

INSTRUCTIONS

  1. In a small bowl, cover the mushrooms with boiling water and let stand until softened, about 30 minutes. Drain and coarsely chop the mushrooms; discard the soaking water. 
 
  2. In a large saucepan, heat the canola oil. Add the pork, garlic, ginger and scallions and cook over moderately high heat, stirring occasionally, until the pork is golden brown, about 3 minutes. Stir in the stock and add the tofu, 1/3 cup of vinegar, the soy sauce, sugar, pepper, sesame oil, mushrooms and 1 tablespoon of Sriracha. Bring the soup to a simmer and season with salt. While stirring constantly, drizzle in the eggs and cook until strands form, 1 minute. Serve hot, passing rice vinegar and Sriracha at the table
    Simple Smoked Turkey Spring Rolls12 spring roll wrappers1 Cup diced smoked turkey 1/2 Cup diced carrots1/2 Cup diced white onion1 Cup cooked thin rice noodlesCanola oil
    Lay out the spring roll wrapper flat. Place a mixture (approximately 2 tablespoons) noodles, turkey & veggies. Fold bottom corner over, fold in the two sides (as if folding an envelope), roll tightly.
    Heat canola oil to 360 degrees, fry spring rolls in small batches. Keep warm in oven until ready to serve. 


Thursday, January 16, 2014

Chinese Style Egg Rolls


Last summer I was determined to make some delicious  springrolls/eggrolls. I searched and found several recipes. Planned and plotted ideas for days until I finally decided to go with Marc's recipe found on his blog "No Recipes." Yeah, evidently he's an ironic kind of fellow.

Summer 2013 recipe making
But what I liked about his recipe is that he did a great job with a detailed step by step plan that made me feel confident in being able to successfully make them. 

Summer 2013 recipe making
I followed his steps pretty strictly.


I planned and then started rolling, his idea to lay out several at a time was helpful.


Finally, I was ready to fry them up.
Summer recipe 2013
They looked pretty great and I was excited with my success.
Summer 2013 recipe
We had them on the patio to celebrate a nice August weekend meal.


But here's the thing. They weren't great. The filling was fantastic but sadly I bought the spring roll wrappers at our typical grocery store. Bad choice. They were crisp on the outside of the wrapper but the inside of the wrapper was like chewy. Not at all like a crisp spring roll.

See even back in August I had come across Jaden's recipe on Steamy Kitchen and she specifically said, "don't buy the wrappers at your Western grocery." You need to buy the frozen kind you find at the Asian market. But I was attracted to Marc's recipe because he used the noodles inside the roll which I like. As typical you live and learn. Buy only the wrappers you find at the Asian grocery.

So last weekend I decided to give them try #2. But this time I went with Jayden's advice and made her recipe too.
Making the filling - Winter recipe 2014
It all started out good.
Winter recipe 2014
I even tilted the filling after it was cooked to drain the juices on Jayden's advice.

Winter recipe 2014
I rolled them carefully, making sure to not leave space inside.

Winter recipe 2014

This time I used my little fry baby gadget too which was a good option for frying in the winter as I typically only deep fry outside on the grill burner to avoid that deep fried house smell. They turned out beautiful, light crisp and not greasy at all.

So here's the deal the wrapper on Jaden's recipe was perfect. But I have to say I like the filling fixing from Marc's recipe better. I think it was the noodles that I love. 

But they both taught me a lot about making eggrolls or spring rolls.

RECIPE:

Links to both of their recipes below.

No Recipes

Steamy Kitchen


Sunday, January 12, 2014

Lobster Bisque


This wonderful lobster bisque was part of our New Year's Eve big bash of a meal.

And by big bash I mean no bash at all. Now in our mid forties the whole big night out on New Year's Eve is a distant memory for us. We were trying to remember the last time we actually did go out on New Year's and as best we can both remember it was at least 5 years ago in Chicago seeing Poi Dog Pondering. That was actually a great New Year's. But both of us agree there have really been only a few great New Year's in our lives. It's typically just a bunch of hype and then some let down.

So several years ago we decided to set a standing dinner at home date for New Year's eve and we've pretty much stuck to it. A few years we've had friends over to join us but we made a pact to NEVER go out again unless there is really something worth doing. 


So to welcome 2014 we went with a lobster theme. G made this silky and luscious lobster bisque and I made our fav pot sticker recipe lobster and shitake. It was a nice evening and we actually stayed up 'til midnight and watched the ball drop. That was unusual. 


Happy New Year to You!

RECIPES:

(link to Lobster Shitake Potsticker recipe)

Lobster Bisque adapted from Fine Cooking
For the broth:
  • 1 1-1/2- to 1-3/4-lb. live lobster, rinsed ( we used 2 lobster tails)
  • 1-1/2 oz. (3 Tbs.) unsalted butter
For the bisque:
  • 2-1/2 oz. (5 Tbs.) unsalted butter
  • 1 medium yellow onion, chopped
  • 1 small carrot, peeled and finely chopped
  • 1 large clove garlic, finely chopped
  • 1-1/8 oz. (1/4 cup) all-purpose flour
  • 1 cup dry white wine
  • 2 Tbs. tomato paste
  • 1 Tbs. chopped fresh thyme
  • 1 dried bay leaf
  • 1 cup heavy cream
  • 2 Tbs. cream sherry
  • Kosher salt and freshly ground black pepper
Make the broth:
In an 8- to 10-quart stockpot, bring 1-1/2 inches of water to a boil over high heat. Add 1 tsp. salt and the lobster, cover, and steam until bright red and one of the smaller legs twists off easily, about 18 minutes. Remove the lobster with tongs and reserve the steaming liquid.
When the lobster is cool enough to handle, twist off the claws and the tail. Using a nutcracker, crack the knuckles and claws and push out the meat with your little finger or a pick. Set the tail on a hard surface and use your hand to press down and crack the shell; push out the meat. Slice the tail meat in half lengthwise and remove the black intestinal vein. Dice the meat from one claw and half of the tail and set aside for garnish. Coarsely chop the remaining meat. Reserve the shells.
Rinse out the tomalley (green matter) from the upper body. Split the body lengthwise and use your fingers to remove the innards. (If the lobster is female, you’ll see bright-red roe; leave it in the body for additional color and flavor.)
Use kitchen shears or a chef’s knife to break the body and reserved shells into 1- to 2-inch pieces and then use a meat mallet or a small pot to flatten them.
Measure the steaming liquid and add water to total 6 cups of liquid. Melt the butter in a 4-quart saucepan over medium heat. Add the flattened shells and cook, stirring occasionally, until they begin to blister and their color intensifies, about 5 minutes. Add the liquid and 1/2 tsp. salt and bring to a boil over high heat. Reduce the heat to medium low and simmer, uncovered, for 30 minutes, skimming off any foam that rises to the surface.
Strain the broth through a fine sieve into a large liquid measuring cup. You should have 4 cups—if there’s more, boil until reduced to 4 cups; if there’s less, add water.
Make the bisque:
Clean and dry the saucepan and melt the butter in the pan over low heat. Add the onion, carrot, and garlic and cook until softened, about 15 minutes. Sprinkle in the flour and cook, stirring, until golden and bubbly, about 2 minutes.
Add the wine, tomato paste, thyme, and bay leaf; bring to a boil, and cook, stirring, until the liquid is slightly reduced, about 3 minutes. Add the lobster broth and cook uncovered over medium heat until slightly reduced, about 5 minutes. Add the chopped lobster meat and simmer for 2 minutes to heat. Remove the bay leaf.
In a blender, purée the mixture in batches until smooth. Strain through a medium-mesh sieve back into the pot, pushing on the solids with a wooden spoon.
Stir in the cream and sherry, season to taste with salt and pepper, and cook the bisque over low heat until slightly thickened, about 10 minutes.
Serve the bisque garnished with the diced lobster meat.

Thursday, January 2, 2014

Corn Queso Fundido


Happy 2014! 

We can't believe we just celebrated three years completion of sharing our life through food on this spot. Although we have to admit the last 6 months have not been our best in keeping up with documenting our eats. We should maybe make a resolution to improve on this but we're not big on the resolution thing as it just seems like a sure fire way to fail. So we'll just say we hope to do better in 2014.

But back to the celebrating part. We've been over indulging celebrating with food a lot through the month of December it's almost time to get back to that healthy Paleo eating life again soon I think. 

One dish we love to celebrate with is Queso Fundido. I mean melted cheese in any form is right up our alley. The first time we had queso fundido was at a Tex Mex restaurant in Portland, Oregon called Oba about 15 years ago. And to be honest we've been trying to successfully replicate that version every since. But sadly we've never quite hit it just right yet but we're always trying.

This recipe we found in a recent Food & Wine magazine was worth a shot given it had corn in it which G is always attracted to.  It was good, maybe not as creamy as we would of liked it but the flavors were great overall with the poblano that we roasted it really had some yummy flavor. 


RECIPE: 

Corn Queso Fundido adapted from Food & Wine

  1. 1 pound frozen sweet corn kernels (3 cups), thawed
  2. 2 tablespoons extra-virgin olive oil
  3. 1 poblano chile—roasted, stemmed, seeded and finely diced
  4. 1 small onion, finely diced
  5. Kosher salt
  6. 1 large garlic clove, minced
  7. 1/2 pound Monterey Jack cheese, shredded
  8. Finely chopped cilantro, radish matchsticks and thinly sliced jalapeños, for garnish
  9. Corn tortilla chips, for serving
  10. In a blender, puree half of the corn with 1/2 cup of water until smooth. Strain the puree through a fine sieve into a medium bowl.
  11. In a cast-iron skillet, heat the olive oil. Add the poblano, onion, remaining corn and a pinch of salt and cook over moderate heat, stirring, until softened and barely browned, about 10 minutes. Add the garlic and cook until fragrant, about 2 minutes. Add the corn puree and cook, stirring, until bubbling, about 2 minutes. Add the cheese and cook over low heat, stirring, until melted. Season with salt and garnish with cilantro, radish and jalapeño. Serve hot, with tortilla chip

Thursday, July 18, 2013

Chipotle Cherry Chicken Wings


One food we seem to enjoy year round is chicken wings. We enjoy them so many different ways but most often spicy and grilled. And this version fit those requirements as well.

We've made this Chipotle Cherry Barbecue Sauce recipe found on Epicurious lots of times now over the years. Most recently we whipped up a batch on 4th of July for my sister's pool party to be used on our smoked gouda stuffed turkey burgers that I forgot to get photos of unfortunately. 


Since we have always enjoyed this sauce I actually made a triple batch to share with friends but to also have some on hand for future summer grilling escapades such as this lazy, beautiful Wednesday evening. 


On this mid week evening we were both thinking wings were sounding pretty darn good. I found our jar of the chipotle cherry bbq sauce in the fridge and decided we'd give grilled wings with the sauce a try, served with a strawberry spinach salad.


G cleaned up the wings per his usual type A way (thank goodness). We grilled them simply at first with salt & pepper. 


After they were pretty well cooked we then brushed them lightly with the chipotle cherry sauce to give them a little bit of caramelizing that we love on grilled wings.


Once the wings were done we then tossed them in a little more sauce and served them with our strawberry spinach salad and a Washington 2012 Tempranillo from our Lake Chelan vacation that paired perfectly. 


The wings and sauce were great. I think there are better ways we both enjoy our wings and the sauce separately but this worked for a mid week "Lets Eat" kind of meal. 


RECIPE:

Chipotle-Cherry Barbecue Sauce

From: Bon Appétit  | July 2010 by Steven Raichlen, Francine Maroukian, and the Bon Appetit Test Kitchen
  • 1 cup ketchup
  • 1/2 cup cherry preserves (We also added some canned whole cherries with juice to give a chunky texture)
  • 2 tablespoons fresh lemon juice
  • 2 tablespoons mild-flavored (light) molasses
  • 2 tablespoons golden brown sugar
  • 1 tablespoon Worcestershire sauce
  • 1 tablespoon soy sauce
  • 1 teaspoon finely grated lemon peel
  • 1 to 2 canned chipotle chiles in adobo, minced, plus 1 tablespoon adobo sauce from can ( we used 3 to go spicy)
  • 1 teaspoon liquid smoke
  • 1 teaspoon onion powder
  • 1 teaspoon unsweetened cocoa powder


Bring ketchup, cherry preserves, lemon juice, molasses, brown sugar, Worcestershire sauce, soy sauce, lemon peel, chiles, adobo sauce, liquid smoke, onion powder, and cocoa powder to simmer in medium saucepan, stirring often. Reduce heat to medium-low and simmer 10 minutes, stirring often. Season sauce to taste with salt and pepper. DO AHEAD: Sauce can be made up to 1 week ahead. Cover tightly and refrigerate.

Sunday, April 21, 2013

GCC: Sun-Dried Tomato Parmesan Crisps


This week for Gutsy Cooks Club our assignment was these tasty little treats; Sun-Dried Tomato Parmesan Crisps. 

And talk about a find of a recipe. It was simple and right out of the oven these little bites were pretty much irresistible, like I dare you to eat just one kind of irresistible. Made with frozen puff pastry, which we typically do have in our freezer, they are the perfect last minute, "nothing to snack on, " whatever excuse you need...kind of snack. 


Super simple. Start with some sun-dried tomato paste mixed with olive oil.


Roll out the puff pastry. More evidence that I'm not a baker would be the horrific job of evenly rolling out the pastry dough. But even with this work they tasted scrumptious.


I then spread the dough with the sun-dried tomato and olive oil mixture.


I was actually excited to have an excuse to use this little gadget we have in our mess of drawer to make ravioli that we've only used two times.


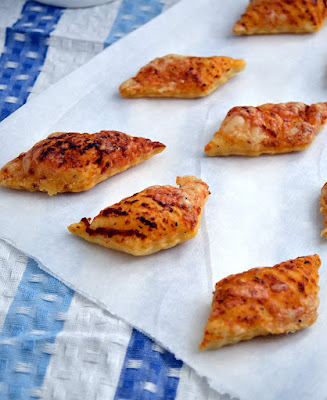
I used the crinkle wheel to cut the dough in diagonal pieces.


And then topped the dough with some shaved Parmesan. 


They came out of the oven crispy, cheesy and delicious. 


I made them to go with the at home version of the roasted tomato soup that we made during our cooking class in Cabo. I made the crucial component of the soup; the herb infused olive oil. 


I slathered the Roma tomatoes with the oil and a good douse of seasoning. 


Without the wood fired oven I had to roast ours on our grill. But sadly my soup hardly tasted anything like the lush soup we had in Mexico. It was disappointing.
So I won't be sharing the recipe because obviously we need to tweak it a bit to get it right. 


Luckily, the real star of the meal was the crisps anyway.


One of the things I love about Gutsy Cooks Club is recipes like this. Recipes that might catch my eye but I don't really have a reason to make them. But GCC gives me the reason to try and then they become "our" recipes. 


We actually used them the next night as croutons in our Caesar salad. A great way to use up some leftovers. 

Check out  the recipe here.

Check out the other Gutsy Cooks' recipes here

RECIPE:


Sun-Dried Tomato Parmesan Crisps (from Martha Stewart)
3 tablespoons sun-dried tomato paste (or regular tomato paste)
1 tablespoon extra-virgin olive oil
All-purpose flour, for dusting
1 piece store-bought puff pastry, thawed
1/2 cup freshly grated Parmesan cheese
1/4 teaspoon ground black pepper
Directions
Preheat oven to 375 degrees, with oven rack in center position.
In a small bowl, combine sun-dried tomato paste and olive oil.
On a lightly floured surface, roll out puff pastry to 12-inch square. Transfer to a parchment-lined baking sheet.
Spread tomato paste mixture evenly over puff pastry with a rubber spatula. Top with cheese and black pepper. Using a pizza wheel, cut into quarters in one direction and sixths in the other to yield 24 pieces.
Bake 20 to 22 minutes until puffed and golden. Let cool to room temperature on cooling rack before serving.


Thursday, March 7, 2013

New York Strip Poutine with Gorgonzola Sauce


Oh boy, have we found a new guilty pleasure. Yeah, it's kind of scary to us just how much we love this  dish. It's far from Paleo but since our realistic goal is only 80% of our meals we justify this in the 20% non-paleo category. And it was to celebrate G's 43rd birthday so we had to indulge, right?

The first time we had poutine was while visiting Vancouver B.C. a couple of summers ago. Evidently poutine is kind of like the national unhealthy dish of Canada or something. You don't see it on a lot of menus around Seattle or Tacoma but in the few places we have found it we have ordered it. Basically it's fries covered in in cheese curds and gravy. Mmmmmmmm so good.

We were inspired by a version we recently had at Marrow restaurant that was topped with Hanger steak. We took a liberty with our at home version and added a Gorgonzola sauce too. 


They were pretty simple to make at home. We started with a well seasoned New York steak that we seared first in a cast iron skillet on top of the stove and then cooked until medium rare in the oven.


We then baked our frozen fries while we let our steak rest. Of course homemade fries would be even better but we cheated on that step for our first time. And to be honest they were fantastic so not sure if we'll make from scratch next time either. 


We then topped the hot fries with our local Beecher's fresh cheese curds.


Then we sliced the steak over the fries and cheese curds, poured G's homemade gravy  over the steak and lastly topped it all off with the Gorgonzola sauce.

Forget Chili Cheese Fries the Canadians know how to top fries with the good stuff. If you haven't had poutine yet give it a try. Then go for a run or even better walk your Bully like we did.


Happy indulging.