Pages

Wednesday, February 27, 2013

Mexican Poached Eggs


It's recipes like this one for Mexican Poached Eggs that keep us loving Paleo eating and helping us keep to it pretty much 80% of the time. (which is our realistic goal...I mean come on we are "the foodie couple" we won't go forever without cheese.)

I mean what's to miss with a breakfast like this. And this one came together even faster than imaginable because we used the leftover beef and chorizo taco meat that we had the night before wrapped in lettuce leaves.

Recipe:

Mexican Poached Eggs
2 cup prepared taco meat (combination of leanest ground beef and chorizo seasoned with cumin and chile powder)
4 poached eggs
Fresh tomato salsa
3-4 avocado slices
Cilantro for garnish

Warm taco meat up. Top meat with 2 poached eggs. Add fresh tomato salsa and sliced avocado. Garnish with cilantro


Monday, February 25, 2013

My First Food Photography/Styling Workshop

My first assignment of the day

Recently I had the pure pleasure of attending my first ever food photography & styling workshop. G researched finding a local food photographer, Clare Barboza, who puts on food photography and food styling, done by Becky Selengut, workshops out of her studio in Seattle which he gave me as a gift for Christmas. 

I was so excited for this opportunity. I started this crazy addiction 2 years ago now with a little point & shoot camera and no idea what I was doing. I have upgraded to a DSLR and have read a few books and blogs on food photography but beyond that I still have no idea what I'm doing. 


I arrived to Clare's studio down in the SODO area and immediately thought, "this is going to be so cool." The amount of props and accessories she had was pretty amazing.


And Becky was already working on creating some beautiful food for us to photograph in the studio's kitchen.

Clare first gave us a nice tutorial first while reviewing some of her beautiful photos. She asked us to first consider what kind of feel of mood we wanted to set in our photo: "Rustic, Modern, Elegant or Sweet?"

Assignment #2 of the day, staging shot #1. 

She encouraged us  to consider the textures, background and surfaces. 

Assignment #2 staging/style #2.

She reminded us to think of colors, complementary recommended and the clutteredness of the photo.

Assignment #2, styling/staging #3

She us asked to consider the size or our props and making sure the props make sense.
She then turned us loose in her studio to photograph Becky's beautiful food.
I was definitely a bit intimidated , feeling like I really had far less expertise than the other gals in the workshop.

The first dish with the trumpet mushrooms and pesto Becky styled for us on the plate.
The dahl dish we plated ourselves.


We all took our styling and staging very seriously. It was a fairly quiet place when we were taking our photos.


And then the tasty part of the class after we were done shooting our photos then we got to eat our beautiful delicious dishes.

Assignment #3, Style/Staging #1


Our final dish of this beautiful mango salad we plated and styled ourselves. I was trying so hard to get the aperture right on this first shot. I have such a hard time with this technique.

Assignment #3, style/staging #2

I finally gave up and changed out lenses and tried to get a darker, moodier look on my last shot.

It was an inspiring day. Of course I walked away thinking I needed a new camera but upon reflection what I really need is just a class about how to really use my camera. I'm not patient enough to read the manual and really do want to know how to use it all my lenses properly.

But G gets a huge gold star for this gift. It was the perfect day and the perfect gift for me. If you are in the Seattle area I highly recommend checking this workshop out.

Tuesday, February 19, 2013

Seattle Restaurant Crawl


We spent 2 of our 4 day President's weekend staying in downtown Seattle. Although Seattle is less than 30 miles away from our home we just don't spend as much time there as we like to or used to. But when we do have a weekend up there we make it a point to try as many new food spots as we can possibly fit in during our time.

We were up there so I could attend a great photography/food styling workshop that G bought me as a Christmas gift (more about that experience soon.) This entire blog idea was actually inspired by a trip we made like this in Seattle in December of 2010. Our idea was to have an avenue to record and document our restaurant experiences so we could remember all of the great food we've enjoyed.

Lavender Lemon drop

We arrived to Capitol Hill early evening on Saturday. After checking into our hotel we decided to just walk around and find a place to start off with a cocktail. And we were so lucky to not have rain for our entire weekend so there was lots of walking. We came across la Spiga, a restaurant we had initially thought about trying last spring but didn't follow through with. It was a busy place but there was space for us at the bar which was perfect because we really only wanted a cocktail before heading to the next spot. I had a lavender lemon drop that was just a bit too heavy with lavender flavor for my taste. That and the fact that a couple sitting next to us at the bar were in a pretty awkward argument made me ready to move on to the next spot pretty quickly.

The view from the bar @ Anchovies & Olives

Next we headed to Anchovies & Olives, a restaurant by Seattle Restaurant Icon Ethan Stowell, that we had tried to get into several different times in the past but never got lucky enough. We had called earlier in the day to try to get a reservation and were told, "no such luck" but to try to came after the dinner hour, around 8ish and try to walk in. We arrived about 8:30 and were told by the hostess there wouldn't be a table until 10:00. But a kind waiter overheard our conversation with the hostess and he told us to head over to the new restaurant attached, Bar Cotto and there will be a place at the bar soon and that we could eat off the full dinner menu from the bar.

Spicy Coppa Salumi

We took his suggestion and headed over to Bar Cotto. Which is a great smaller type salumeria and cocktail bar. We sat up at the bar and order wine and two small plates. The first a salumi; spicy coppa that was dry, spicy and cut so delicately. It was melt in your mouth kind of good. We also ordered the Carne Cruda Bruschetta with Pecorino and Arugula. A dish we must say was AMAZING if you like the tartare thing like we do.

Shortly after we actually got seated the waiter came over and told us they were saving a place for us at the bar next door when we were ready but to take our time. He was accommodating and went out of his way to make sure we got to eat dinner at Anchovies & Olives which we really appreciated.

We sat at the bar and had an amazing meal. We decided to just enjoy our food and our experience and not take photos. But we clearly will remember the wonderful dishes we indulged in. We started with the Ahi Tuna with kumquats, chili and citrus oil. It was spicy with the just the right amount of bite from the citrus. Next we had the grilled octopus with controne beans and pickled red onions. G loved the grilled octopus. Me not so much. I thought the octopus was a bit too chewy and the controne beans were too crunchy for my taste. Lastly we shared the Fettuccine with Dungeness Crab, Pecorino and Black Pepper. The fettucine was such a light and refreshing dish, so unexpected from the usual heavy fettucine alfredo. It was excellently delicious.

Chilaquiles

That was the night for us for the evening. Hey we were out past 11:00 a rare happening in our current middle aged lifestyle. We were full and satisfied. We needed our walk back to our hotel to help us digest our wonderful long meal. 

The next morning we headed to Skillet Diner for breakfast. We'd been there for dinner before but never for breakfast. We sat down at the counter. 


G ordered the Bacon Jam Bloody Mary. I passed because I wanted to be fully with it for my photography workshop. I had Chilaquiles which is my fav dish to order in Mexico so when I see it on a menu locally I usually give it a try. They were pretty good. They could of used some shredded chicken to help balance some of the acid from the tomatillo salsa. G had had a crazy breakfast sandwich with eggs, bacon, cheese sandwiched between to hotcakes. He loved it.

I spent my day learning how to make food prettier in pictures for the day (although not evidenced by the photos on this post obviously...still struggle with how to get good photos in restaurants with low lighting), G tried a few pizza places and coffee spots until he picked me up late in the afternoon.

Sunday night we made reservations at Restaurant Zoe as it was voted one of 2012's best restaurants by the Seattle Met. It was directly across from Skillet Diner so we had already checked it out through the window when we walked by on our way to breakfast. The vibe was hipster cool surrounded by urban rustic kind of decor. I loved it and felt immediately that I was going to like this place. We noticed that they had a chef's tasting menu that we decided to indulge in with the wine pairings. We were kind of digging the no choices idea of the evening. 


We started with the most deliciously sweet and briny oyster as our first course.


The next two courses tied as my most absolutely favorite dishes of the night or maybe ever. Yes, they were that good. The first was Steak Tartare with grilled scallion puree, cornichons and the most delicately delightful fingerling chips. It was such a good dish. As weird as it sounds it tasted like the flavors of a perfect burger.

Next, was an absolutely beautiful dish (that I didn't get a photo of because at first whiff of its aroma I knew I couldn't waste any time in tasting it with taking a photo.) Fresh Ricotta Gnudi with Oyster Mushrooms and Truffle Oil. This was OMG good. No kidding it was soft and luscious in your mouth with the woodsy flavor of the mushrooms and the richness of the truffle oil. So GOOD!


Next we went onto Grilled Arctic Char with Cauliflower Puree and Steelhead Roe. This again was a superb dish, not my personal favorite because arctic char is just too soft of a fish for me to enjoy, kind of like a trout texture. But the flavors were great overall. G loved it. 

Finally we ended with dessert; a chocolate coconut tart and a version of creme brûlée. Needless to say we were stuffed beyond belief and so happy with both our choice of restaurant and meals. And each dish additionally was paired with an amazing wine. It was a great night. 

The next day we took advantage of our 12:00 hotel check out time and had a leisurely get up morning. Took our time, enjoyed the Jacuzzi tub and headed over for a late breakfast in the South Lake Union area to Tom Douglas's Serious Biscuit. We've hit this spot before but G LOVES it so its worth a revisit again and again. 


I had the ham, egg, Beecher's cheddar biscuit with apple mustard. Let me tell you the biscuit was amaze balls and that apple mustard was the bomb. 

G had the chicken fried steak biscuit and he was in heaven.
Definitely somewhat of a gut bomb of heaviness to get us through the rest of the day. Literally, these sandwiches kept us full and satisfied all day. 

Our winter 2013 Seattle restaurant crawl was fantastic. It was the perfect combo of trying some new spots and hitting a couple of old favs too. 
It was a great weekend all the way around.

Thursday, February 14, 2013

Red Velvet Cupcakes for Two


Happy Valentine's Day! 

When you spend the majority of your hours in an Elementary school you can't help but getting caught up in the excitement of Valentine's Day. For so many kids this so called Hallmark holiday is more exciting than even Christmas. 

Especially the primary aged kiddos, they love making their Valentine envelopes and bringing their cards & treats (now more treats than cards) for their friends. The joy and happiness they get from opening their cards from friends is catching.

 I think any reason that encourages you to shower folks with love and appreciation is a good thing. So when I found this recipe for Red Velvet Cupcakes for just two people on the Baker Chick's blog I was ecstatic.  I love cupcakes and even better red velvet cupcakes. But with just 2 of us I never make either. 


Not only were the cupcakes moist and delicious cleaning up after only making two cupcakes was so much easier and faster than after making a full batch...I may always only make 2 cupcakes from here on out. 

RECIPE:


Red Velvet Cupcakes for Two ( from The Baker Chick)
1 tablespoon butter, melted
2 tablespoons and 1 teaspoon white sugar
1 tablespoon sour cream
1/2 teaspoon white vinegar
1/2 teaspoon vanilla extract
3/4 teaspoon red food coloring
1 egg white
3 tablespoons and 2 teaspoons all purpose flour
3/4 teaspoon cocoa powder
1/2 teaspoon baking powder
pinch of salt.

cream cheese frosting for two:
2 oz. cream cheese- softened
2 tablespoons of butter- softened
1/2-3/4 cup powdered sugar
1/4 tsp vanilla extract.

Instructions
  1. Preheat oven to 325 degrees. Line 2 muffin tins with cupcake liners.
  2. In a small bowl, sift together the flour, cocoa, baking powder and salt.
  3. In a second small bowl or spouted measuring cup, combine the melted butter and sugar. Stir until well-combined.
  4. Add the sour cream, vanilla, vinegar, food coloring and egg white, and mix until smooth and creamy.
  5. Gradually add the dry ingredients to the butter mixture and stir till combined- being careful not to over-mix.
  6. Divide batter between two cupcake liners Bake for 15-18 minutes or until a tester comes out clean. Allow to cool before frosting.
  1. For the Frosting: 
  1. Beat the butter and cream cheese together until smooth and creamy. add the vanilla and powdered sugar, 1/4 cup at a time and mix until frosting is free of lumps, creamy and spreadable.

Monday, February 11, 2013

Cream Puffs with Vanilla Ice Cream and Chocolate Sauce


Okay, are you setting your table for your Valentine's Day at home meal yet?
If not it's just about time here's our final addition to our Valentine's Day Menu. Dessert= Cream Puffs with Vanilla Ice Cream and Chocolate.


Here's what's on the Valentine's Day menu:


Mini-Lobster Rolls (originally posted Jan. 29th)


Cream Puffs with Vanilla Ice Cream and Chocolate Sauce


You know it has to be a special occasion if I'm baking cream puffs. Now the fact that this is a Thomas Keller recipe did intimidate me a bit being the absolute baking hater that I am. But actually these were pretty doable even for me. And definitely just enough special too. 


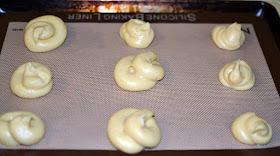
It starts with piping the pasty swirls. A baking first for me.


As you can see they do look fully amateur but they tasted pretty darn good. 


Especially sandwiched on top of some excellent local Vanilla Bean Ice Cream covered some Seattle made Fran's Dark Chocolate Sauce.


We topped them with some fresh raspberries. Since we started the meal with some raspberry garnishing why not end it in the same way too.

Well we do hope our menu inspired you to not get sucked into the Valentine's Day restaurant chaos and instead make your own special meal at home.

We wish you and your special one a wonderful meal, hopefully made at home.

RECIPE:


Cream Puffs with Vanilla Ice Cream and Chocolate Sauce (adapted from Epicurious)
1 cup water
5 1/3 tablespoons (about 3 ounces) unsalted butter
1 tablespoon plus 1 teaspoon sugar
1/8 teaspoon kosher salt
1 cup all-purpose flour
4 to 5 large eggs
1 1/2 cups Chocolate Sauce
1 1/2 cups Vanilla Ice Cream

Preheat the oven to 450°F.

Line one baking sheet with a Silpat and a second one with parchment paper (or line both sheets with parchment if you don't have a Silpat). Set up a heavy-duty mixer with the paddle attachment.
Combine the water, butter, sugar, and salt in a medium saucepan and bring to a simmer over medium-high heat. Reduce the heat to medium, add the flour all at once, and stir rapidly with a stiff heatproof or wooden spoon until the dough pulls away from the sides of the pan and the bottom of the pan is clean, with no dough sticking to it. The dough should be glossy and smooth but still damp.
Enough moisture must evaporate from the dough to allow it to absorb more fat when the eggs are added. Continue to stir for about 5 minutes, adjusting the heat as necessary to prevent the dough from coloring. A thin coating will form on the bottom and sides of the pan. When enough moisture has evaporated, steam will rise from the dough and there will be the nutty aroma of cooked flour.
Immediately transfer the dough to the mixer bowl and mix for a few seconds to release some of the heat from the dough. With the mixer on medium speed, add 4 eggs, one at a time, beating until each egg is completely incorporated before adding the next one; scrape down the sides of the bowl as necessary. Turn off the machine. Lift some of the dough on a rubber spatula, then turn the spatula to let it run off: It should fall off the spatula very slowly; if it doesn't move at all or is very dry and falls off in one clump, beat in the additional egg.
Place the dough in a pastry bag fitted with a 1/2-inch plain tip. Pipe 15 disks (this will give you 3 extras for testing) about 1 1/2 inches across and just under 1/2 inch thick on the Silpat-lined baking sheet, leaving about 1 1/2 inches between them, as they will expand when baked. Pipe the remainder on the other sheet. (You will have about 4 dozen in all.) Bake the 15 puffs for the recipe and freeze the ones on the second baking sheet until firm, then transfer to a freezer container and freeze for another time.
Bake the puffs for 10 minutes, turn the sheet around, turn the oven down to 350°F, and bake 15 minutes more. Remove one puff and break it open: It should be hollow inside and not gooey or eggy; if it is still moist, return it to the oven and check in 5 minutes. Cool the puffs completely on the baking sheet. Store in an airtight container until serving time.

To serve:
Preheat the oven to 300°F.
Warm the chocolate sauce in a double boiler or a microwave. Warm the profiteroles on a baking sheet in the oven.
Split each profiterole in half and arrange 3 on each plate. Place a small scoop of ice cream in the bottom half of each profiterole and top with the lid. Spoon the sauce over.

Friday, February 8, 2013

Dirty Shirley Cocktail


Do you remember Shirley Temples? No, not "the" Shirley Temple child actress, although I did love watching her on weekends as a kid too.

But I remember on special dinners out with my family as a kid my parents would let my sister and I order a Shirley Temple. Sweet and fruity with maraschino cherries on top. We both loved them and thought it was a very special treat when eating out.

So when looking for a nice cocktail to kick off our special Valentine's Day menu I came across the Dirty Shirley recipe on Pinterest and I thought what a perfect Valentine cocktail.

Here's what's on the Valentine's Day menu:

Dirty Shirley Cocktails

Mini-Lobster Rolls (originally posted Jan. 29th)


Cream Puffs with Vanilla Ice Cream and Chocolate Sauce


Pink, light and fruity. I decided to change it up a bit since fresh cherries in Winter are not readily available using both raspberry flavored vodka and fresh raspberries instead of cherry. 


A great simple and festive cocktail to kick off a nice romantic Valentine's meal. Since they are sweet one is plenty and since we wanted to have wine with our meal that was perfect all the way around.

A good cocktail for Friday or for a Valentine's Day celebration.


RECIPE:


Dirty Shirley Cocktail (makes 2 cocktails)
4 oz. Raspberry flavored vodka
1 splash grenadine flavoring
8 oz. diet citrus flavored soda
Fresh raspberries
ice

Pour into each glass 2 ounces of vodka, a splash of grenadine and 4 ounces of citrus soda. Fill glasses generously with ice cubes. Add fresh raspberries. 

Wednesday, February 6, 2013

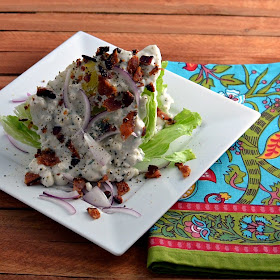
Iceberg Wedge with Warm Bacon and Blue Cheese Dressing


 Today I'm sharing the second course recipe from our Valentine's Day at home menu line up.

Here's what's on the Valentine's Day menu:

Dirty Shirley Cocktails

Mini-Lobster Rolls (originally posted Jan. 29th)

Iceberg Wedge with Warm Bacon and Blue Cheese Dressing 


Cream Puffs with Vanilla Ice Cream and Chocolate Sauce


Sometimes when you are making a menu for your love you end up making something that may not be your favorite but instead something they will love. This is one of those dishes for me. I just recently started eating blue cheese and although I do now like some actual blue cheeses with crackers I'm still not a fan of blue cheese salad dressings. But G loves a good steak house iceberg wedge salad with blue cheese and bacon.

And I figured since I was making the blue cheese dressing from scratch I could control the flavor of the bitterness of the cheese by choosing a milder cheese. Which I did and it did help me like this salad a bit more. Still not my favorite salad but it did make G happy and  that's what love is all about I've learned these past 15 years = compromise and selflessness.

This is a great simple salad to kick off a Valentine's Day special dinner. And the great thing about this recipe is you can make all of the components ahead so you can just throw the salad together when you are ready.


RECIPE:


Iceberg Wedge with Warm Bacon And Blue Cheese Dressing (adapted from Epicurious)
1 1/2 cups mayonnaise
2 tablespoons fresh lemon juice
1 tablespoon coarsely ground black pepper
1 teaspoon hot pepper sauce
1 cup coarsely crumbled blue cheese
Buttermilk (optional)

1/2 pound thick-cut bacon, cut crosswise into 1-inch pieces
1 large head of iceberg lettuce, cut into 6 wedges, each with some core attached
1/2 red onion, very thinly sliced

Mix first 4 ingredients in medium bowl. Add blue cheese and stir until well blended. If too thick, thin with buttermilk by tablespoonfuls to desired consistency. (Can be made 1 day ahead. Cover and chill.)
Cook bacon in large skillet over medium heat until golden brown and beginning to crisp. Arrange lettuce on plates. Spoon dressing over. Using slotted spoon, transfer warm bacon from skillet onto salads, dividing equally. Garnish with red onion.

Monday, February 4, 2013

Braised Beef Short Ribs


I remember very clearly about five years ago when we both absolutely agreed that eating out on Valentine's Day would never happen again. And it hasn't. 

And we were even at one of our still favorite little romantic restaurants but on Valentine's night it was missing its usual romantic feel. Line out the door, even with a reservation the wait was at least 30 minutes or more. There were only a few main dish choices. The wait staff was not the usual and the additional staff wasn't well versed on their great selection of wines. Finally, the wait in-between courses made us annoyed not feeling lovey dovey. Yeah, like we said we haven't done that since.

Now we make a lovely dinner at home each year instead. I thought leading up to Valentine's day I would post and build a  complete Valentine's menu to share with you and maybe it would inspire you and your love to eat at home instead of eating out on the second most busy restaurant event of the year, only second to Mother's Day. 

Here's what's on the Valentine's Day menu:

Dirty Shirley Cocktails

Mini-Lobster Rolls (originally posted Jan. 29th)

Iceberg Wedge with Warm Bacon and Blue Cheese Dressing 

Braised Beef Short Ribs

Cream Puffs with Vanilla Ice Cream and Chocolate Sauce

To kick off the menu I'll start with the main course, Braised Beef Short Ribs a recipe adapted from Epicurious. G loves braised short ribs it's one of his favorite lazy Sunday kind of meals. The recipe is absolutely perfect too with bacon and pearl onions. And because it braises 4-5 hours the ribs unreservedly melt in your mouth. 


I first found some scrumptious looking short ribs. 


This recipe actually does have quite a few ingredients but with some prep and planning and time, it's well worth making.


And with our faithful kitchen companion Sally Pork Chop in the kitchen for moral support all that time in the kitchen just flies by. 


In our opinion the key to the world's best short ribs is making sure to give them a great sear on every side of the rib. The more brown goodness they have after searing the more delectable flavor they'll have after hours of braising. 


And seasoning them well is another important step for excellent flavor. My sister gave us these great selections of flavored salts for Christmas from Napa Style. For this recipe I kept it simple using the soft flavor of Sicilian White Salt.


Sautéing carrots,  onions and garlic add the next layer of important flavor.


And pureed whole San Marzano tomatoes add the next layer of flavor. If you can find these authentic Italian tomatoes they are 100% worth the search. They really do have superior canned tomato flavor.


And next the addition of red wine and a good beef broth really pull all of the flavors together. Actually the recipe calls for demi-glace concentrate or veal stock. I couldn't find either of these this time, but to be honest I didn't look that hard either these ingredient are both incredibly rich and most of the time too rich for my tastes so we subbed a good quality beef broth instead. 


Next the beautifully browned beef ribs go back into the dutch oven and braise in the oven at 250 degrees for 4-5 hours until they are gently falling off the bone.


While the ribs braise you can cook the vegetables and bacon which get added back to the ribs after you skim the fat off the top. You then put a rib in your bowl pour vegetables and sauce over the rib. And top with bacon and thyme sprigs. 


Absolutely Delicious! Absolutely! And a special main course for any special occasion. 

RECIPE:


Braised Beef Short Ribs ( adapted from Epicurious)

For short ribs
4 (8-ounce) pieces bone-in beef short ribs
1 tablespoon vegetable oil
3/4 teaspoon fine sea salt
1/2 teaspoon black pepper
4 medium carrots, finely chopped
1 medium onion, finely chopped
2 garlic cloves, finely chopped
1 (14-ounce) can whole San Marzano tomatoes in juice, puréed in a blender with juice
1 1/2 cups dry red wine
4 cups brown veal stock or 1/2 cup Demi-Glace Gold concentrate (concentrate requires a dilution ratio of 1:8; 1/2 cup concentrate to 4 cups water)
2 sprigs fresh thyme
1 Turkish or 1/2 California bay leaf
1 tablespoon red-wine vinegar
1 tablespoon balsamic vinegar

For vegetables
20 pearl onions (5 ounces)
1 1/2 tablespoons unsalted butter
1 tablespoon Banyuls vinegar or red-wine vinegar
2 cups chicken stock or reduced-sodium chicken broth (16 fluid ounces)
4 medium carrots, cut diagonally into 1 1/2-inch pieces
3 thick bacon slices (preferably applewood-smoked; 1/4 lb total), cut crosswise into 1/4-inch pieces
8 medium fresh white mushrooms, trimmed and quartered lengthwise


Braise short ribs:

Put oven rack in lower third of oven and preheat oven to 250°F.

Pat beef dry. Heat oil in a wide (12 inches in diameter) 3- to 5-quart heavy pot over moderately high heat until hot but not smoking, then brown beef on all sides, turning with tongs, about 8 minutes. Transfer to a plate and sprinkle with 1/4 teaspoon sea salt and 1/4 teaspoon pepper.
Add chopped carrots, onion, and garlic to oil in pot and cook over moderate heat, uncovered, stirring occasionally, until softened, about 5 minutes. Stir in 1 cup puréed tomatoes (reserve remainder for another use) and bring to a boil over moderately high heat. Add wine and boil, stirring occasionally, until sauce is thickened, about 8 minutes.
Add veal stock, thyme, bay leaf, vinegars, and remaining 1/2 teaspoon sea salt and 1/4 teaspoon pepper to sauce, and bring to a simmer. Skim fat from surface, then add beef along with any juices accumulated on plate and cover pot with a tight-fitting lid. Transfer to oven and braise until beef is very tender, 4 to 5 hours.

Cook vegetables while beef braises:

Blanch pearl onions in a wide 2- to 3-quart heavy saucepan of boiling water 1 minute, then drain in a sieve. When just cool enough to handle, peel onions with a paring knife, trimming root end just enough to leave onions intact.

Heat butter in dried saucepan over moderate heat until foam subsides, then cook onions, stirring occasionally, until brown spots appear, 3 to 5 minutes. Stir in vinegar, then add chicken stock and carrots and bring to a boil. Reduce heat and simmer, covered, until vegetables are tender, 20 to 25 minutes. Uncover and boil, if necessary, until liquid glazes vegetables.
While vegetables are simmering, cook bacon in a 10-inch heavy skillet over moderate heat, stirring occasionally, until lightly browned, 4 to 6 minutes. Add mushrooms and cook, stirring, until mushrooms are tender and bacon is browned and crisp, about 4 minutes. Transfer with a slotted spoon to vegetables in saucepan.
Assemble dish:

Transfer a short rib to each of 4 soup plates and keep warm in oven. Pour sauce through a medium-mesh sieve into a large bowl, pressing on and then discarding solids, then skim fat from sauce. Boil sauce, if necessary, until thickened and reduced to about 3 cups. Season with salt and pepper. Add about 2 cups sauce to vegetables (reserve remaining sauce for another use), then spoon mixture around short ribs.